Announcements
Table of Contents
Overview
What is it? Announcements are short posts — like a noticeboard inside the app — that keep everyone in the clinic informed. Each announcement has a title, a message, an optional picture, and an expiry date.
Who is it for? As a Staff member you can read announcements AND create and edit them.
Where do I find it? On your Dashboard, look for the "Announcements" card (marker 1). A number badge shows how many unread announcements you have.
Prerequisites
Before you begin, make sure you have:
- [ ] A logged-in staff account
- [ ] Notifications turned on so the bell (marker 2) alerts you to new posts
- [ ] Permission to view announcements — set up by your administrator
- [ ] To create announcements: your account must have "create" permission
Getting Started
View your first announcement
- Open the app and go to the Dashboard.
- Find the "Announcements" card (marker 1) — it says "You have announcements to read".
- Tap the card to open the announcement list.
- Tap any card, or tap READ MORE (marker 6), to read the full message.
The announcement is automatically marked as read the moment you open it — no button to press.
Opening from a notification: When a new announcement arrives you'll get a notification via the bell (marker 2). Tap it and the app takes you straight to that announcement.
Screen Map
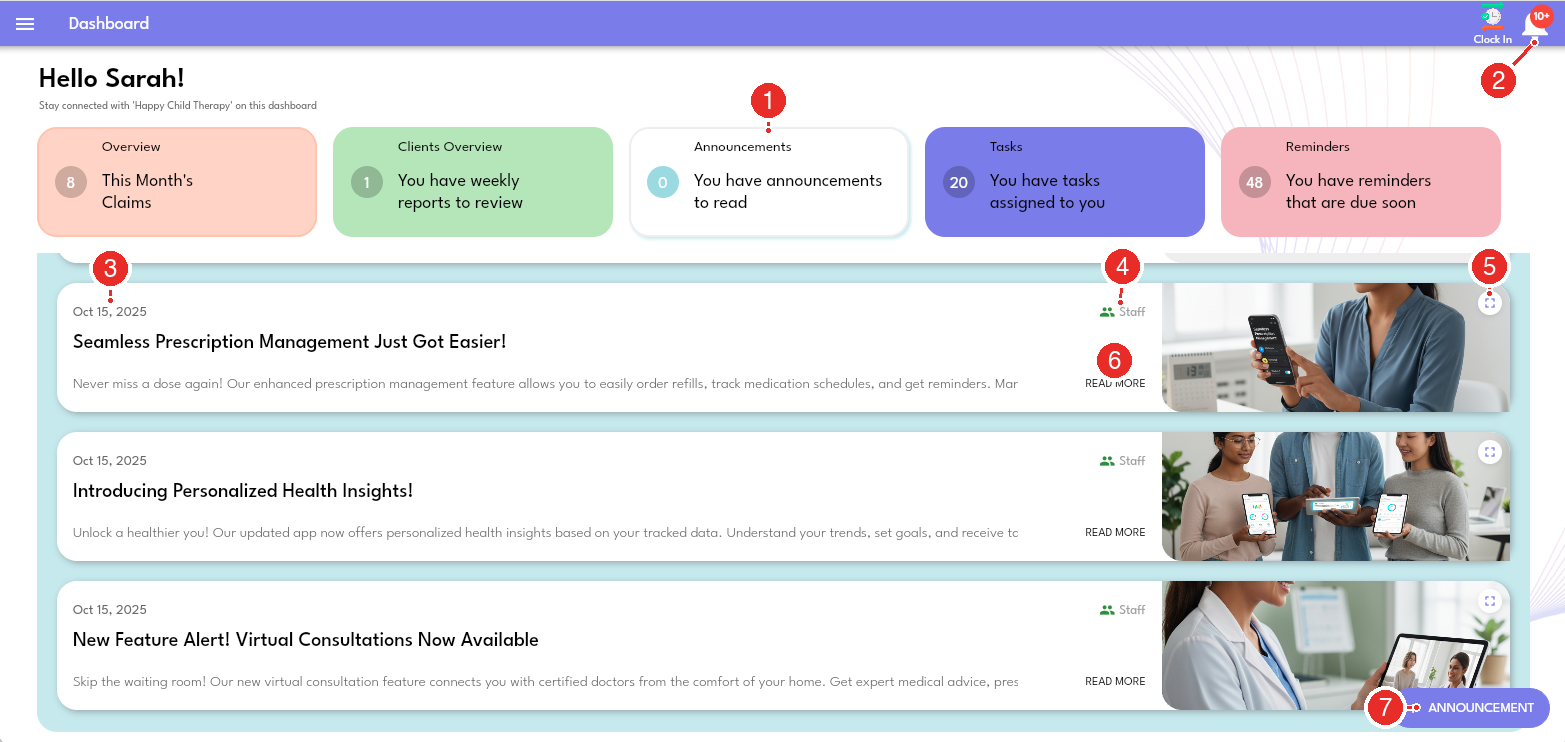
| Marker | What it is | What it does |
|---|---|---|
| 1 | Announcements card | Entry point — shows unread count, opens the feed |
| 2 | Notification bell | Alerts you when a new announcement arrives |
| 3 | Date | When the announcement was posted |
| 4 | Target audience tag | Shows who it's for — Staff or Clients |
| 5 | Fullscreen icon | Opens the announcement image full-screen |
| 6 | READ MORE | Opens the full announcement and marks it as read |
| 7 | + Announcement button | Create a new announcement |
Core Concepts
Unread vs. Read
- New announcements you haven't opened show a red "New" tag.
- Opening one marks it as read automatically — no button to press.
Date & Expiry
- Each announcement shows its posted date (marker 3).
- Every announcement has an expiry date. After that date it disappears. Tapping an old notification for one that's gone shows: "The announcement is no longer available or may have expired."
Target Audience
The audience tag (marker 4) shows who a post is aimed at — Staff or Clients.
Features & Usage
Reading announcements
- Scroll the list — more announcements load automatically as you scroll.
- Tap READ MORE (marker 6) — see the full message and picture.
- View a picture full-screen — tap the fullscreen icon (marker 5).
- Empty list? — you'll see "No New Announcements at This Time."
Creating an announcement
- Tap the + Announcement button (marker 7).
-
Fill in the form:
Field Required? What to enter Expiry date Yes When the announcement should disappear Target audience Yes Staff Member or Client Title Yes A short headline Description Yes Your full message (supports bold, lists, checkboxes) Image Optional One picture — PNG or JPG, under 5 MB -
Tap SUBMIT. You'll see "Announcement added successfully."
Editing an announcement
- You can only edit announcements you created.
- Open it and tap the Edit (pencil) icon.
- You can change the title, message, and image — expiry date and audience are locked.
- Tap SUBMIT to save. You'll see "Announcement edited successfully."
!!! tip "Quick Tips" - Keep notifications on so you never miss an update. - Add a picture to make your post stand out — keep it under 5 MB. - Set the expiry date thoughtfully so old notices clean up on their own. - There is no "mark as read" button — just open a post and it's done.